How to use the TensorFlow Hub text module to build a model to predict the type of movie based on related descriptions
Examples of applying transfer learning to computer vision models are common, but what if it is used for text classification? May wish to enter TensorFlow Hub, which is a content library that enhances TF models through transfer learning. Transfer learning is a process of selecting the weights and variables of an existing model that has been trained with a large amount of data, and applying them to their own data and prediction tasks.
Transfer learning has many benefits, one of which is that you don’t need to provide a lot of your own training data as you did when training from scratch. But where do these existing models come from? This is where TensorFlow Hub is so powerful: it can provide a complete storage area for checkpoints of existing models for all types of models (images, text, etc.). In this blog post, I will introduce how to use the TensorFlow Hub text module to build a model to predict the type of movie based on related descriptions.
You can use Colab to run this model in a browser without any settings.
Import data and preprocess
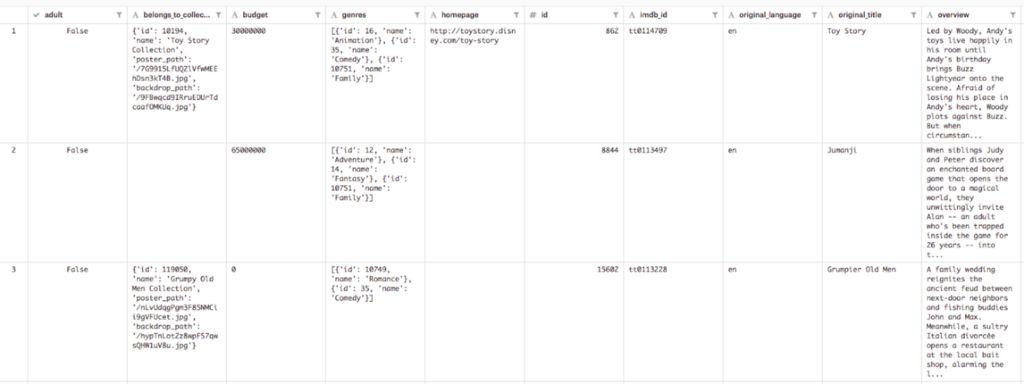
In this model, we will use the Kaggle Movie Dataset, an excellent public domain resource. The data set contains data for more than 45,000 movies, and each movie has a large amount of relevant data. For brevity, we only use the movie description (called "introduction") and movie genre in this dataset. The following is a preview of this dataset in Kaggle:
Note: Kaggle movie data set link
https://
First, we will import the content library to be used to build this model:
1import numpy as np
2import pandas as pd
3
4import tensorflow as tf
5import tensorflow_hub as hub
6
7from sklearn.preprocessing import MultiLabelBinarizer
I have placed the CSV file of this dataset in a public Cloud Storage bucket. We can run the following command to download the data to our Colab instance and read it in Pandas dataframe format:
1!wget'https://storage.googleapis.com/movies_data/movies_metadata.csv'
2data = pd.read_csv('movies_metadata.csv')
3
4descriptions = data['overview']
5genres = data['genres']
For simplicity, we limit the possible types to the following:
1top_genres = ['Comedy','Thriller','Romance','Action','Horror','Crime','Documentary','Adventure','Science Fiction']
We limit the data set to movies that describe non-blanks in these types, and then divide the data into a training data set and a test data set according to the ratio of 80% training and 20% testing:
1train_size = int(len(descriptions) * .8)
2
3train_descriptions = descriptions[:train_size]
4train_genres = genres[:train_size]
5
6test_descriptions = descriptions[train_size:]
7test_genres = genres[train_size:]
Use TF Hub to build the embedding layer
Only a very small amount of code is required to create the embedding layer with TF Hub. Our model has only one feature (description) and will be expressed as an embedded column. Text embedding provides a way to represent text content in a vector space, so that similar words or sentences in the embedding space will be closer (you can read more about it here). You can build a text embedding vector from scratch completely using your own data. TF Hub can provide text embeddings that have been trained using various text data, thus simplifying this process.
Note: text embedded link
https://
For English text, TF Hub provides a variety of embeddings that have been trained with different types of text data:
Universal sentence encoder: for longer text input
ELMo: Deep embedding trained using 1B Word Benchmark
Neural Network Language Model (Neural Network Language Model) embedding: training through Google News
Word2vec: Trained by Wikipedia
The pre-trained text embedding you choose is a hyperparameter in your model, so it’s best to experiment with different text embeddings to see which has the highest accuracy. Start with a model trained with the text closest to your text. Since our movie descriptions are all long inputs, I found that using the universal sentence encoder embedding has the highest accuracy. This can encode our description as a high-dimensional text vector. Please note that this particular model is large and consumes 1GB of capacity.
Note: Link to General Sentence Encoder
https://
We can use hub.text_embedding_column to create a feature column for this layer with one line of code, and pass it the name of our layer ("movie_descriptions") and the URL of the TF Hub model to be used:
1description_embeddings = hub.text_embedding_column(
2"movie_descriptions",
3module_spec="https://tfhub.dev/google/universal-sentence-encoder/2"
4)
Please note that this unit is downloading pre-trained embeddings, so it will take some time to run.
The biggest advantage of this operation is that we can feed the text description into pre-trained word embeddings without any preprocessing. If we build this model from scratch, we need to convert the description into a vector ourselves, but using the TF Hub column, we can pass the description string directly to the model.
Change label to multi-hot encoding
Since a movie tends to have multiple types, our model will return multiple possible tags for each movie. Our genre currently has a list of strings for each movie (eg ['Action','Adventure']). Since the length of each label must be the same, we need to convert these lists into a multi-hot vector of 1 and 0 (corresponding to the type in the specific description). The multi-hot vector of an action-adventure movie is as follows:
Note: multiple possible tag links
https://en.wikipedia.org/wiki/Multi-label_classification
1# Genre lookup, each genre corresponds to an index
2top_genres = ['Comedy','Thriller','Romance','Action','Horror','Crime','Documentary','Adventure','Science Fiction']
3
4# Multi-hot label for an action and adventure movie
5[0 0 0 1 0 0 0 1 0]
To convert a string label to a multi-hot vector in just a few lines of code, we need to use a Scikit Learn utility called MultiLabelBinarizer:
1encoder = MultiLabelBinarizer()
2encoder.fit_transform(train_genres)
3train_encoded = encoder.transform(train_genres)
4test_encoded = encoder.transform(test_genres)
5num_classes = len(encoder.classes_)
You can print encoder.classes_ to view a list of all string classes predicted by the model.
Build and train the DNNEstimator model
For our model, we will use DNNEstimator to build a deep neural network that can return a multi-hot vector. This is because each movie will have 0 or more possible labels (this is different from a model where each output has exactly one label ). The first parameter we pass to DNNEstimator is called head, and this parameter defines the type of label our model is expected to have. We want our model to output multiple labels, so we use multi_label_head here:
1multi_label_head = tf.contrib.estimator.multi_label_head(
2num_classes,
3loss_reduction=tf.losses.Reduction.SUM_OVER_BATCH_SIZE
4)
Now, when we instantiate DNNEstimator, we can pass it. The hidden_units parameter represents the number of layers in our network. This model has 2 layers, the first layer has 64 neurons, and the second layer has 10 neurons. The number of layers and the layer size are hyperparameters, so you should try different values ​​to see which is best for your data set. Finally, we pass the feature column to the estimator. In this example, we only have one feature column (description), and it has been defined as a TF Hub embedded column above, so here we can pass it as a list:
1estimator = tf.contrib.estimator.DNNEstimator(
2head=multi_label_head,
3hidden_units=[64,10],
4feature_columns=[description_embeddings]
5)
We are basically ready to start training the model soon. Before training the estimator instance, we need to define the training input function. The input function can connect our data to the model. Here, we will use numpy_input_fn and feed our data to the model as a Numpy array:
1# Format our data for the numpy_input_fn
2features = {
3"descriptions": np.array(train_descriptions)
4}
5labels = np.array(train_encoded)
6
7train_input_fn = tf.estimator.inputs.numpy_input_fn(
8features,
9labels,
10shuffle=True,
11batch_size=32,
12num_epochs=20
13)
The batch_size and num_epochs parameters in our input function are both super functions. batch_size can tell our model how many examples will be passed to the model in one iteration, and num_epochs refers to the number of times our model completes the entire training set.
Now we can start training our model. Just use one line of code:
1estimator.train(input_fn=train_input_fn)
In order to evaluate the accuracy of the model, we create an eval function input_function with our own test data, and then call estimator.evaluate():
1eval_input_fn = tf.estimator.inputs.numpy_input_fn({"descriptions": np.array(test_descriptions).astype(np.str)}, test_encoded.astype(np.int32), shuffle=False)
2
3estimator.evaluate(input_fn=eval_input_fn)
The AUC of this model reaches 91.5%, and the precision/recall rate is 74%. Your results may be slightly different.
Use our trained model to generate prediction results
Now comes the most exciting part: generating predictions based on data that our model has never seen before. First, we set up an array containing some descriptions (I get these descriptions from IMDB):
1raw_test = [
2"An examination of our dietary choices and the food we put in our bodies. Based on Jonathan Safran Foer's memoir.", # Documentary
3"A teenager tries to survive the last week of her disastrous eighth-grade year before leaving to start high school.", # Comedy
4"Ethan Hunt and his IMF team, along with some familiar allies, race against time after a mission gone wrong." # Action, Adventure
5]
Then, we define the predictive input function and call predict():
1predict_input_fn = tf.estimator.inputs.numpy_input_fn({"descriptions": np.array(raw_test).astype(np.str)}, shuffle=False)
2
3results = estimator.predict(predict_input_fn)
Finally, we can access the results iteratively and display the top 2 genres found for each movie and their confidence values:
1for movie_genres in results:
2top_2 = movie_genres['probabilities'].argsort()[-2:][::-1]
3for genre intop_2:
4text_genre = encoder.classes_[genre]
5print(text_genre +': '+ str(round(movie_genres['probabilities'][genre] * 100, 2)) +'%')
Our model can correctly label all the above movie descriptions.
Getting started
Want to start building your own model with TF Hub? Please refer to this document and tutorial. You can find the complete model code described in this article on GitHub or Colab. In a later blog post, I will introduce how to export this model for use in TensorFlow Serving or Cloud ML Engine, and build an application that can generate prediction results based on the new description.
The Connection Modules is one of parts of connection systems. Including 8/10 pair connection/disconnection krone module, switching, high band modules, quick connect module, 25pair splicing module, 10pair STG module, MDF, STB module.

LSA Module, Lighting Protector, Mounting Frame, STB Module, High Band Modules, STG Module Switch Module, Earth Module, Back Mount Frame
NINGBO YULIANG TELECOM MUNICATIONS EQUIPMENT CO.,LTD. , https://www.yltelecom.com